Monday, February 16, 2015

A New Bee-ginning

Moving to the country has opened up such a range of possibilities that our former life within the confines of an HOA would not allow. One of those things is beekeeping. We'd discussed the possibility and were thrilled to discover there is a Beekeeping Association in our new county. This weekend they hosted an introduction to beekeeping, and we were able to learn the fundamentals of starting our own apiary and harvesting honey! There were more than 50 other beekeepers-in-training in attendance, which is a good sign for the dwindling honeybee population. We want bees not only for their honey, but to pollinate the fruit trees and garden we plan to plant. In addition to video and power point presentations, we were able to go around to stations to see hands-on how the equipment works and speak to experienced local beekeepers. It was a great experience and really got us excited to get our hives set up as soon as possible so we might have honey by summer.


We learned different methods of feeding bees sugar water.


We learned how to build the brood boxes, supers and frames that make up the hive.


Our kiddo was especially fascinated by the hammering involved in hive building.


We learned how to use a smoker to calm the bees.


Finally, we learned how to extract the honey from the comb.

At the end of the class,they held a raffle to give away the beehives we'd built in the class, along with a swarm of bees to populate the hive and some necessary accessories. Lo and behold - WE WON! We planned to start off with two hives, so still need to supplement our winnings with another setup, but what a good omen to our fledgling beekeeping endeavor! 

Friday, February 13, 2015

Valentine Pinwheels Recipe


Last week I signed up to bring a treat to my toddler’s day care Valentine’s Day party. The only other thing listed on the sign-up sheet was cupcakes, so I thought I’d bring something savory. But what to bring. I was browsing pinterest and saw a cute craft where you shape a toilet paper roll into a heart and use it as a stamp. This sparked an idea. I made cream cheese pinwheels for the KLAW’s first birthday… I wondered if I could shape them in to hearts. Turns out, I could – they looked super cute and were quite tasty! I modified the original recipe to make it a little more red and valentines-ish. Here is the recipe. It wasn't a hit with all the toddlers, but you could modify the mix-ins to suit your audience’s taste. It takes less than 30 minutes to prepare the night before your event, then another 15 minutes or less to slice them up the day-of. This recipe makes 40 pinwheels.


INGREDIENTS
2 eight ounce packages of cream cheese (softened)
1 package ranch dressing mix
½ cup diced red pepper
¼ of a red onion, diced
2 ounce can of chopped olives
½ cup shredded cheese
4 large sun-dried tomato tortilla wraps

Mix the ranch dressing mix into the cream cheese, then fold in the pepper, onion, olives and cheese. 
Try not to eat the mixture
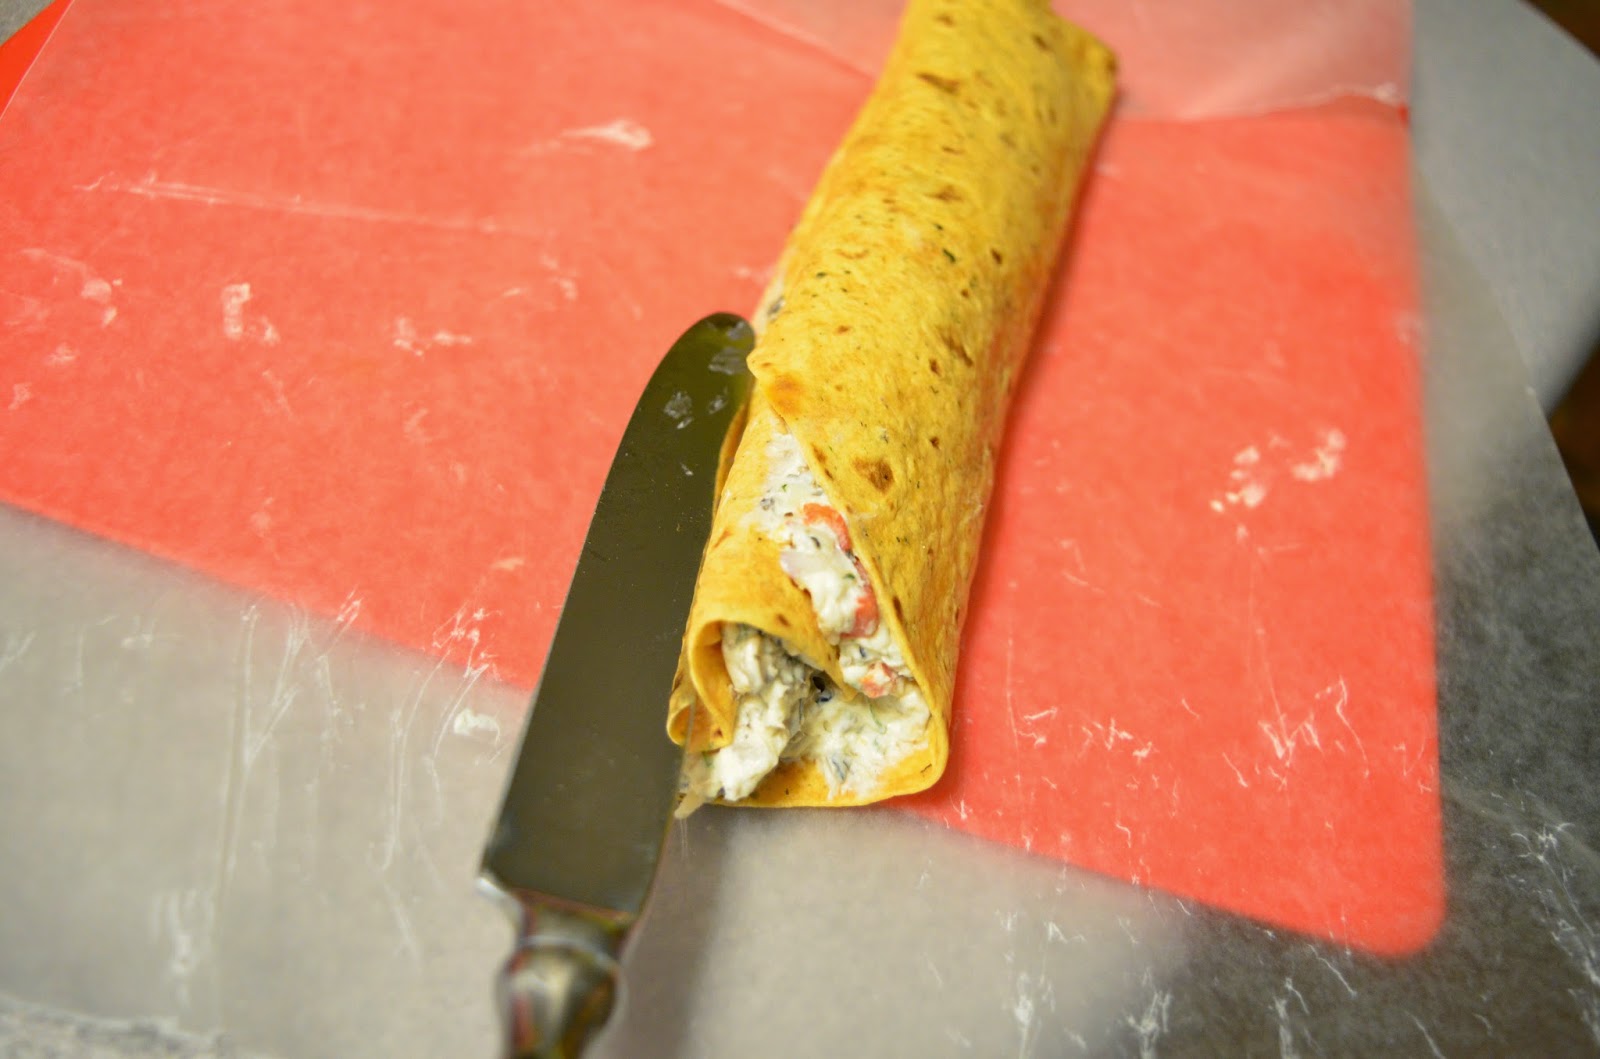
Spread the mixture on the tortillas. You can go easy on spreading the mixture on the two sides that become the open ends of the roll because you will slice them off. 

Roll the tortillas tightly.
Once they are rolled, form the hearts. Pinch one side to form a point, along the roll, to form the bottom of the heart. Opposite the point, use the dull end of a butter knife to press in a divot along the roll to form the top part of the heart. 
Wrap each tube Tootsie Roll style in waxed paper. Refrigerate overnight to allow the ranch flavors to fully come out. 
heart
tootsie roll
In the morning, using a serrated knife to gently saw the roll so as not to smoosh it, cut the ends off the rolls, and then slice each tube into approximately 10 slices (about ¾”-1" each). You can pinch the slices to make them a little more heart-shaped if they look wonky. Arrange on a plate and serve!
slice into 3/4" slices

arrange artfully

Friday, January 30, 2015

DIY Kinetic Sand (Moon Sand) Recipe for PENNIES!


We were in Brookstone recently and they had a display of that kinetic sand or moon sand that is out now. Tom wondered if you could fill a whole sandbox with it. At Brookstone prices, it would cost as much as buying your own beach. But I found a recipe on pinterest and we made our own, for pennies. 

It was fun to make – the KLAW had fun stirring the ingredients but was sad when I wouldn’t let him lick the spoon.


We picked up play sand at Home Depot ($3.50 for 50 pounds) and whipped up a small batch according to the recipe at gimmefreebies.com. I needed to add a little more water than the recipe suggested because the sand wasn't quite coming together. But once it did, the KLAW had a BLAST with it! I'm excited to go back and use the rest of our sand to make more - perhaps using the recipe for bright colors!


We used cookie cutters in it (ten cents on clearance at Dollar General! Score!), molded shaped with some cups and bowls, and transferred sand from container to container (and to the floor!) with hands and spoons. It's not quite as good as the store-bought stuff, but for a toddler it is just as fun as a day at the beach!


Incidentally, I recently found small cookie sheets and cake pans (Mainstay brand) at Walmart for 88 cents. They will be great for all sorts of activities (magnets, sensory activities, wearing as hats, e.tc) – check to see if your store carries them!


INGREDIENTS
  • 5 cups sand (approx. 10 lbs) ~ free or nearly free, if you have it
  • 1.2 cups corn starch (approx. 1 cup + 3 tablespoons)
  • 1/2 teaspoon dish soap (e.g. Dawn Dishwashing Liquid)
  • water (about 1 cup)


DIRECTIONS
  1. Put sand in a container
  2. Add corn starch and mix thoroughly
  3. Mix water & dish soap, then add to sand
  4. Mix thoroughly and enjoy!!
Store in a covered container.


This post contains referral links. If you click through, and buy the product through that link, I get a referral bonus. This income will help pay for this blog.

Tuesday, January 20, 2015

Good Boob Food

As a nursing mom chasing a newly mobile toddler around, I am frequently blindsided by hunger at the most inopportune times. I find myself parked in the driveway, trapped in the car while my kiddo naps in his car seat, scrounging around in the bottom of the diaper bag hoping to find airline peanuts from our last trip.


I was recently introduced to an alternative solution, which would not only help nourish me, but in turn nourish my little nursling. Credible Cravings is a line of snack bars developed by obstetricians, midwives, and nutritionists specifically for pregnant and nursing moms. The bars are made of whole foods that are packed with good-for-mama stuff like folate, iron and fiber rather than just fortified with vitamins like many other bars. For someone who can barely remember to take my vitamins (and by barely, I mean pretty much never), these are awesome.

The oatmeal cranberry is my favorite flavor (oatmeal is great for my milk supply!), but the chocolate and lemon ginger greens options are pretty tasty too! So that means these little bars pack a triple punch – filling, healthy, and easy. Pretty much the perfect snack for women trying to conceive, pregnant or with kids. Heck, they are probably good for everyone!

This is a sponsored post. I was provided a sample of this product for review.

Wednesday, January 14, 2015

His and Hers Chicken Pot Pies

I am a vegetarian. My husband and son are not. I struggle to find ONE meal to satisfy us all and not have to cook everything separately (I hate dishes.). Taco night, for example, is great because I can prepare the toppings for everyone and quickly cook and season real and faux ground beef. Recently, my husband has been requesting those little banquet pot pies to have for lunch. Now that it is cold outside, I have been envious of that dish – so warm and satisfying, with the steam rising up when you break through the crust. And wholesome too – lots of good, filling veggies in there. A recipe for a vegetarian pot pie came across my inbox and so I decided it was time to make a pot pie of my own. Of course, I had to make one for my fellas, too. 

We had some leftover grilled chicken from recent restaurant meals, and it was perfect for this. I have tried every fake meat on the market and for this recipe recommend one of the following: one package of Quorn Naked Cutlets, one bag of Kroger’s Simple Truth Meatless Griller Strips (or the Morningstar Farm strips), or one package of Gardein Chicken Scallopini.


I cobbled together several recipes to get the perfect one, and I wanted to post it here so I can remember how to make it next time. Oh yes, there will be a next time. I added soy sauce and nutritional yeast to the filling to give it an extra boost of soul-warming umami. If you don’t have these on hand, no worries.

The recipe that follows is for a DOUBLE BATCH, one with real chicken and one with vegetarian chicken. You can halve the recipe if you want just one or the other, or keep it doubled but use all meat or non- meat and serve an army of carnivores or dirty hippies (though I suppose dirty hippy vegetarians wouldn't be in an army. A peaceful protest perhaps)

HIS AND HERS CHICKEN POT PIES

Ingredients:
4 large carrots, peeled and cubed
4 medium potatoes, peeled and cubed (I used red potatoes)
2 tablespoons vegetable oil
1 yellow onion, diced
16 ounces mushrooms, sliced (I used baby bellas)
¾ cup butter
¾ cup flour
1 ½ tsp sage
1 ½ tsp thyme
1 ½ tsp pepper
2 tsp salt
1 tablespoon soy sauce
1 tablespoon nutritional yeast
2 cups cooked chicken breast, cubed
AND
2 cups cooked vegetarian chick’n strips or cutlets, cubed
1 carton (32 oz.) of vegetarian chicken broth (I used the Imagine brand Vegetrian No-Chicken Broth)
1 cup frozen peas
1 Package of frozen Puff Pastry (I used Pepperidge Farm’s, it comes with 2 pieces)


Directions:
1.  Cook your chicken and chick’n. My chicken was pre-grilled and I used a large sauté pan to brown my chick’n (I used the same pan later to make the roux). Cube and set aside
2.   Boil the carrots and potatoes for about ten minutes. Drain and rinse with cool water to halt the cooking
3.   Bring your chicken broth to a boil in a large saucepan. Meanwhile, in a large stock pot, cook the onions in the vegetable oil for about three minutes. Add the mushrooms and cook until they begin to shrink. Add the sage, thyme, salt and pepper. Add in the cooked carrots and potatoes and stir to combine. Remove from heat.
4.   Divide the vegetable mixture (if you are doing a split recipe, otherwise carry on in the stock pot). Add the chicken and peas.
5.  Next up is the white sauce. Make a roux by melting the butter in a large sauté pan over medium heat. Slowly whisk in flour until the mixture bubbles and browns. Whisk the roux into the boiling chicken broth. Reduce to a simmer and whisk in the nutritional yeast and soy sauce. You should have a nice creamy sauce that is recognizably a pot pie sauce. Add this to the vegetable/chicken mixtures.
6.  Put the filling into ramekins or casserole dishes as you wish.  It is enough to fill to overflowing a 1 1 ½ qt. Corningware, so I recommend the 2 qt. sizes if you are doing two big pies.
7.  Top with the puff pastry.  I trimmed off the corners so that it was just to the edge of the dish and used the scraps to make sopapillas.
8.  Bake at 375 degrees for 30 minutes or until the pastry is golden brown and puffy.
9.  Sopapilla recipe: toss puff pastry scraps in a cinnamon sugar mixture and bake for 12 minutes at 400 degrees. Re-toss the warm pastries in the cinnamon sugar and top with a drizzle of honey.
Sopapillas

Wednesday, February 26, 2014

Apple Cranberry Brown Butter Pecan Crumble Pie

How do you like dem apples?
I recently split an order of apples with a friend who is a member of Bountiful Baskets farm share. My portion was 10 pounds of small, ripe, delicious Fuji apples. I needed to find a use for them, and had everything on hand to make a pie or a crumble. I asked my hubby which he was in the mood for, and he said both! So I came up with a hybrid pie crumble that was delicious. Unfortunately I'd need to make 4 more to use up the apples, so the rest will probably become applesauce for the KLAW.


FILLING

1/4 cup butter
1/2 cup granulated sugar
1 egg
2 tablespoons all-purpose flour
1 teaspoon vanilla
3/4 teaspoon cinnamon
1/4 teaspoon nutmeg
5 cups sliced peeled apples (I required 7 of my small ones)
1/3 cup dried cranberries
Some excellent compost being generated there

CRUST

1 frozen deep dish pie crust

TOPPING

1/2 cup old-fashioned oats 
1/3 cup packed brown sugar
1/3 cup all-purpose flour
3/4 teaspoon cinnamon
Dash nutmeg
1/4 cup cold butter
1/3 cup chopped pecans


DIRECTIONS

Heat oven to 400°F. Place cookie sheet in oven to heat. 

In small saucepan, cook 1/4 cup butter over medium heat, stirring constantly, until melted and lightly browned. Cool completely, about 15 minutes.
My Quality Control Manager
While the butter is cooling, beat 1/2 cup granulated sugar and the egg with wire whisk until light and fluffy. Beat in 2 tablespoons flour and 1 teaspoon vanilla. Beat in cooled butter, 3/4 teaspoon cinnamon, and 1/4 teaspoon nutmeg. Fold apples and cranberries into the mixture. Pour filling into a frozen pie crust.

To make the topping, mix the dry ingredients except walnuts in a medium bowl. Add the butter in pats and cut in using a pastry blender or fork until crumbly; stir in the walnuts. **Add more butter if necessary. I did not have a pastry blender so I used a potato masher and my hands. Sprinkle topping over the filled pie.

Bake on cookie sheet 20 minutes. Place sheet of foil over pie (crust and topping) to prevent excessive browning. Bake 30 minutes longer or until filling is bubbly and topping is golden brown. 

Cool at least 30 minutes before serving with a scoop of vanilla ice cream!
Nom Nom Nom

Thursday, February 6, 2014

Valentine's Day Photo Prop - Cupid's Arrows

I am going to take pictures of my five month old son for Valentine's day, and was thinking of dressing him up like Cupid. I wanted to craft some little arrows for him to hold but needed them to be super simple. Here is my solution.

First I traced hearts on some red cardstock using a cookie cutter as a template - the smallest one from a set I found at the Target One Spot (dollar bins). Click through for the Cartwheel offer to save more at The One Spot! It is about 3" tall. The hearts will be the spear part of Cupid's arrow


 Next I cut rectangles about 1.5" x 3" and folded in half. I cut the top and bottom on a diagonal to make a diamond shape, and snipped out little strips and tore off the skinny pieces. This made the feathers (when unfolded it became a V shape)


I had on hand some red straws from a pack I found at Ikea. You can use any old drinking straw. Snip a 1" long slit in both ends of the straw and slide the heart in one end and the feather in the other


Voila! Cupid's arrows for your Valentine's Day photo shoot! I didn't add any glue or anything since the paper stayed wedged in there pretty well. But I suppose you could!
Photos from the Valentine's Day photo session to follow...