Showing posts with label vegetarian. Show all posts

Wednesday, July 27, 2016

Vegan Soyrizo Tacos

We had family over tonight for dinner, and I made this up on the fly using ingredients we had in the house. It was a hit with the vegetarians and omnivores alike, and had folks going back for seconds! I typed up the recipe to recreate again sometime! The two specialty ingredients in this really made it. One was the Soy Chorizo from Trader Joe's. I was anticipating the kind of chorizo that is a sausage you can slice, but I was thrown off that this was like a ground meat product once you removed the casing as instructed. It ended up being a blessing as it converted a boring grain dish in to TACO TUESDAY! It was really flavorful, with a strong salt and cumin flavor that meant the whole dish required no additional seasoning.
The second special item was a bag of "Earthly Grains Quick Cook 5 Grains" from Aldi. It has spelt, barley, wheat, rice, and wholegrain oats. I've seen these at a couple Aldi's, but as with all things Aldi they are ephemeral and you might not find them. Any healthy grain - quinoa, farro, freekeh, wheatberries, brown rice, etc. would do nicely, but I'd recommend some of the larger. chewier ones for the texture. 

Vegan Chorizo (Soyrizo) Tacos

1 package Earthly Grains 5 Grain Blend (or 1.5 cups dry grains of your choice)
2 tbsp olive oil
1 bunch fresh spinach, stems removed
1 medium onion, chopped
1 green pepper, chopped
1 package Trader Joe's Chorizo
1 bag (10 oz) frozen corn
1 can (~16 oz) great northern beans (or canellini beans/white kidney beans)
1 tomato, chopped
1 can (6 oz) black olives, sliced
20 small taco size tortillas (flour or corn)
Grated soy cheese, as desired

Prepare the grains according to the package. While the grains cook, in a large pan, heat 1 tbsp olive oil. Cook the spinach until wilted, and set aside. Add another tablespoon olive oil and sautee the onions on medium until slightly translucent and browned. Add the green pepper and cook another few minutes. Remove the casing from the soyrizo and add to the pan, stirring to break up the crumbles. After a few minutes add the frozen corn and cook until thawed. Add in the beans, tomato, olives and spinach, stirring to combine. Add the chorizo mixture to the grains and fill tacos with the mixture and top with cheese.

This made a LOT of food, and I bet it would freeze well rolled up burrito style to reheat later. Speaking of reheating, I'll have to add a picture of the final product when I have the leftovers!

Thursday, June 9, 2016

Vegan Banana Blueberry Lactation Muffins


My nursling has a sensitivity to both eggs and milk, which means I've had to cut them from my diet. Because of that, I can't have most standard baked goods and really miss those sweet treats. I was having some moms over for a meeting to plan our upcoming expo in support of World Breastfeeding Week, so I made some lactation cookies. But since I had some over-ripe bananas, blueberries, and the galactagogue trio of flax meal, brewers yeast, and oatmeal on hand, I thought I'd try to make some muffins, too. Fun fact: flax meal soaked in water is a good egg replacement! I couldn't find a recipe online that exactly fit the bill for what I imagined making, so I modified a few I found online. The cookies came out okay, but the muffins were the real hit. I was a little short on flour, and the muffins were a little TOO moist (if there is such a thing), so I'm modifying the recipe to include a little more flour than I used. I also threw in all the blueberries we had left, which was slightly more than the cup the recipe calls for.

Vegan Banana Blueberry Lactation Muffins
Yield: 12 muffins

Ingredients
2 tbsp flax meal
4 tbsp warm water

1/3 cup cocount oil
2 medium ripe bananas
1 tsp vanilla
1/4 cup unsweetened almond (or other non-dairy) milk

1/2 cup white sugar
1/4 cup brown sugar
1 1/4 cup flour
1 cup quick oats
2 tsp baking powder
1 tsp baking soda
2 tbsp brewers yeast
1/4 tsp salt

1 cup blueberries

Directions
Preheat oven to 350 degrees. In a small bowl, combine flax meal and warm water. Allow to soak while you prepare the remaining ingredients, at least 5 minutes. In another small bowl, microwave the coconut oil until liquefied. Combine the dry ingredients (sugars, flour, oats, baking powder, baking soda, brewers yeast and salt). In a medium bowl, mash the bananas, Add the remaining wet ingredients (vanilla, milk, oil and flax meal slurry). Add the wet ingredients to the dry ingredients and combine. Fold in the blueberries. Pour batter in to a greased or lined muffin tin, approximately 1/4 cup batter per muffin. Bake for 20-25 minutes. Allow to cool slightly before serving.

Tuesday, May 26, 2015

I Picked a Peck of Pickled... Radishes?


With my radish crop becoming ripe, I found myself with more radishes than I could possibly consume on my own. The best way I could think of to extend the life of my produce was to pickle them. Last night I did just that.


I first harvested all the radishes. There were a handful that were still too small, and may never full develop, but the yield from my twelve square feet of garden (after having already picked enough for a snack and a side dish) was well over 100 radishes. And I still have time to replant in that same square footage, if I wanted (and I probably will). Those hundred radishes resulted in 7 jars of pickles, with three of those having carrots mixed in. It would have been six 16 oz. jars of all-radish pickles.


I decided to try a couple different recipes, since I have no clue what the result would be. Naturally, I turned to pinterest and found two promising variations. One was a basic pickle, using apple cider vinegar and honey. The other was a more Asian style using rice vinegar and sugar.


I began by prepping all my radishes, removing the greens and roots. The chickens and goats seemed to enjoy those, so there is no waste! Then I sliced all the radishes to about 1/8" thickness using my mandolin, which made them nice and consistently sized, and saved me a bunch of time, I'm sure. Radishes are so small that it was a little difficult to use the hand guard thing, but I've watched enough food network to know you should never use a mandolin with your bare hands.


For the first recipe, courtesy of gardentherapy.ca, I stayed pretty true to the recipe except I used pickling salt instead of sea salt. I'm hoping the amounts required to get a good brine are pretty consistent between those two.


For the more Asian version, I modified slightly a recipe I found on the Whole Foods website to use ingredients I had on hand. Those jars contain a mixture of 2/3 radishes and 1/3 carrots. I omitted the cucumber, chilies, ginger, and onion - all of which would make them way more delicious but I didn't have the foresight to pick them up at the store. Next time! I also played with the pickling juice a bit and tested three variations:

  1. Rice vinegar and pickling salt
  2. Seasoned rice vinegar and pickling salt
  3. Seasoned rice vinegar and pink Hawaiian salt

They are in the fridge now, since both recipes are considered "quick pickles" and are not meant for long term storage. They should be ready to try by tomorrow! I'll report back with the results. fingers crossed!


Saturday, May 23, 2015

Everything's Coming up Radishes


Establishing a new farm takes a lot of patience. Waiting for the seasons to change, baby animals to grow, and gardens to start producing a bountiful harvest all require a huge investment of time and energy before there is any tangible reward. At the advice of our local Ag Extension office, I planned to get the seeds in the ground for our garden on or around April 15th. Well, mother nature had a different plan and dumped two weeks of rain on us right when I'd hoped to plant. Once the rain cleared and I was able to till the garden patch, the seeds finally went in the ground, right at the end of April. And then I waited. With no previous experience with the local soil, and never having planted a garden this big or varied, I have no idea what to expect.

Our garden has somewhere around 70 varieties of produce planted, the bulk of which are seeds from a kit we purchased a while ago that was intended as something you could keep stored in the event of societal collapse ... or if you just wanted a crap ton of seeds that were heirloom varieties. Because the kit came pre-assembled, it included many items I would have probably passed over when browsing the seed racks at the local shop, such as Swiss chard or radishes. Radishes have never held much of an appeal to me. I have never scooped a single radish on to my plate at the salad bar. I'm not sure why, perhaps just ignorance. But into the ground radish seeds went, figuring what the heck, if nothing else I'd find a radish-loving neighbor.


Lo and behold, the first green sprouts to show their leafy faces, were the radishes. They grew quickly and plentifully. I checked my notes, and realized the radish takes only 21-28 days to mature. Which means, a month into my garden I've already had my first harvest! I sampled some of the young radishes, which were so surprisingly tender and moist. I ate those sliced with some salt, and when I shared photos of my small bounty, my friends asked what recipe I would be preparing. Recipe? You mean radishes can be used for something other than salad garnish? A quick scan of pinterest revealed a slew of options for these mysterious quick-growing root vegetables.


Tonight I pulled a huge bunch of radishes fresh from the garden. Tom wanted to grill, and I didn't have time to run to the store to pick up corn or potatoes, or another staple grilling accompaniment. I know that anything you roast you can just ass easily do in a foil packet on the grill, Radishes aren't all that different from potatoes, right? 


I washed the bunch of radishes, removed the roots and greens, and quartered them. I tossed the radishes in the foil packet with a drizzle of olive oil, some salt and pepper, and a sprinkling of garlic powder for good measure. I decided to keep it simple since I had no clue what a cooked radish tasted like.  It turns out it's reminiscent of a beet crossed with a Brussels sprout. The cooking cuts the inherent spiciness of the radish but imparts a certain... earthiness? Anyhow, I recommend this recipe if you want to try a little something different. I feel a little silly writing out the actual recipe since it's so ridiculously easy, but here ya go:


Grilled Radish Packets

1 bunch radishes (about 14)
Olive oil
Salt & Pepper to taste
Garlic powder or other seasonings

Remove roots and greens from radishes and quarter. Place on a large sheet of heavy duty foil. Drizzle with olive oil and sprinkle with spices. Close foil packet up securely. Place on the upper rack of a hot grill and cook for 15-20 minutes until tender.

Enjoy!

Monday, April 6, 2015

Baby Led Weaning: An Introduction


I recall being at a barbecue, about 1 year B.C. (before children) and seeing my friend Kristen's young daughter toddling around in adorable cloth diapers, munching on a stalk of raw broccoli. I was flabbergasted. Cloth diapers in 2012? Babies eating food that wasn't pureed into an unidentifiable mush? I immediately began peppering her with questions. How I adopted her cloth diaper ways is a story for another post, but I was intrigued to learn from her about this thing called Baby Led Weaning. I learned that babies, from a very early age, can eat a variety of whole food, and THEY LIKE IT! You mean I didn't have to wash blender parts, prepare 87 different recipes, or drop a small fortune in the baby food aisle to make sure my kid was getting the best food out there? Sign me up!

I did my research once The KLAW was born, and we decided to give this BLW stuff a try. I love talking about our experience with it, and find myself sharing tips over and over within my mom groups. My friend Darcy challenged me to write a blog post on the topic, and I thought it was a great idea. Not only could I reach more people, it would save me from retyping the same way-too-long facebook posts every few weeks.

Very Hungry Caterpillar
Please note: I've had one child. His personality and developmental curve led themselves to BLW. He tried everything I offered him, so much so that his first birthday had a "Very Hungry Caterpillar" theme. But remember: Every baby is different. YMMV. I hope you can use these tips, but please don't despair if your experience with your own child isn't the same as ours. As long as your kid is reasonably healthy (peeing, pooping, growing), you're doing great. And if your kid is fed a pouch or a puree - don't panic! Your kid is not broken! It's not worth ruining Christmas because a well-meaning Grandma thought little Jimmy looked hungry and needed some nom noms and shoved mashed banana in his face with a spoon.

First, what exactly is Baby Led Weaning? In my experience, it has absolutely nothing to do with weaning. The KLAW is still nursing many times a day, but also loves to eat solid food. It should be called Baby Led Food Introduction, in my opinion. Basically, you take cues from your child as to what they are ready to try in terms of solid food, and introduce accordingly. They are fed table foods, just like mama and dada eat, complete with seasonings and (unless it is a normally pureed/soft food like applesauce or mashed potatoes) they are served in easy to handle pieces. The child is offered the food, and eats as much as he wants. This supposedly teaches portion control and reduces obesity later in life. I found that some days The KLAW could put away an entire small chicken breast with some sides, and other days would rather feed the whole thing to the dog. Remember, for kids under one, food is for fun. Most of their nutrition is still coming from breastmilk or formula.

Happy to share
Signs of Readiness

This Cheeto is delish.
The signs your child is ready for solid table food become pretty obvious. He should be able to sit up, even if it's with some support in a padded high chair or bumbo. He should be showing an interest in what you are eating. We knew The KLAW was ready to start on solids when, at five months old, he grabbed a Cheeto out of his daddy's hand and started chomping on it happily. The next two signs are a kind of chicken/egg situation. The skills will start out rudimentary, but improve quickly with practice eating. The baby should be able to pick up an object in his fist, put it in its mouth, and gnaw on it. At first your kid might stab himself in the eye with a zucchini spear, then take a nibble and immediately eject it from his mouth with his tongue. NORMAL. He's learning. This will improve quickly. One difference between BLW and spoon feeding is that with BLW a baby learns to chew, then swallow, whereas with purees, the baby learns to swallow, then chew.

Next, he might get the food to the back of his mouth, but gag, and maybe even throw up. Traumatic, but again, NORMAL. Gagging is not choking. Your baby might choke on any number of food or non-food items. Knowing the baby Heimlich is important. But if your kiddo is trying to down a delicious piece of asparagus and suddenly looks and sounds like he's hacking up a hairball? Yeah, that's gagging. NORMAL. Look up BLW videos on YouTube to see what to expect. Soon your kid will go from grasping his food like a microphone to being able to pick up small pieces with his fingertips using a pincer grip. At this point your options for self-feeding increase dramatically. I honestly think that BLW helped The KLAW develop really great manual dexterity.

The KLAW was a dental prodigy from an early age. He cut his first teeth at 5 months, and is currently working on his two year molars (the final four baby teeth) at 18 months. While I think this helped speed along his affinity for solid foods, you would be freaking amazed what these little tykes can gum. The KLAW was eating bits of steak with two or four teeth. So if your child is showing all the other signs of being ready for food, don't let his gummy smile hold you back! Fun fact: Cold, raw foods with soothing properties (like cucumber) can provide teething relief, as can frozen fruits (such as grapes) offered in a mesh teether.

Pickles are delicious and feel good on my swollen gums
Allergies

Introduce new foods with caution, one food every three days or so to make sure there are no allergies. There is so much literature out there about allergies, all conflicting. Introduce peanuts too early, your child will have a peanut allergy. Don't introduce them early, your kid will have a peanut allergy. Who knows. We have no family history of food allergies, and no reason to believe our kid had any sensitivities based on the foods he received second-hand from my breast milk. So we stuck to the three day rule for a couple weeks, then just let him try whatever. I kept a list of foods he tried, so that we could back out what he might have reacted to, if he had a reaction. Process of elimination is easier when you only introduce one at a time, is the logic behind the three day rule.

Also, just because you see some redness on your kid's face, doesn't mean a trip to the ER. Consider what you just fed your child. Was is applesauce with a healthy dose of cinnamon or garlicky hummus? Did your kid smear it all over his face or drool incessantly throughout lunch? Ok, now think about how YOUR face would look if you gave yourself a cinnamon/garlic facial. Probably red and irritated. It's NORMAL. Use your mama gut, as with most things parenting-related.

But what about gluten and sugar? I dunno, but these donuts are delicious!
Honey is the one food that is an absolute no-no for any child under one. It is not an allergy situation, it is the fact that honey can contain botulism, which their little immune systems can't fight off. The botulism can't be cooked or filtered out, so can remain even in processed foods. Be mindful of honey graham cracker products, honey cereals, and honey butters. After the age of one, go nuts with the local honey, it's supposedly great to ward off those allergies!

What to feed your kid

By now you're probably thinking, ok great, but WHAT DO YOU FEED THE BABY? Again, the answer is, for the most part, whatever mama and dada are eating. I found myself modifying my meals or restaurant orders slightly to accommodate my youngin's developing palate. That means more soft finger foods to share (never order an infant a kid's meal, you'll be wasting your money). But if it tastes good to you, chances are it could taste good to your kid. Have you tasted rice cereal or "chicken pea pear" puree baby food? GROSS. If you wouldn't eat it, why would you want your kid to?

AVOCAD-NO!
Don't be afraid of spices and herbs, or dishes with several integrated ingredients. I found that The KLAW would not eat avocado, but would put away some guacamole on tortilla chips (the thin ones - super thick ones are no bueno for babies: not crumbly enough and with sharp corners). At seven months old he was eating curry, By one year he would eat salsa with a spoon. Not every kid will be like that of course, but you'll never know if you don't try. Even butter and garlic in mashed potatoes made them more appealing to my little guy. Limit salt and sugar to your discretion. Cook your food a variety of ways as you would for yourself. Roasted, grilled, or sauteed foods offer you more opportunity to infuse a little flavor than plain ol' steaming.

I set out with the intention of offering my kid wholesome healthy foods. ONLY wholesome healthy foods. File that delusion under "I was a better parent before I had a kid." When The KLAW's first food was a Cheeto, I realized that an organic, whole food, fresh-from-scratch every day lifestyle was, for us, a pipe dream. I mean, was I really going to give up Cheetos? My list of suggested foods includes nice healthy choices along with those quick and easy snack foods that are good for playdates, grocery store distractions, and other public/meltdown-inducing situations.

Stage One: Fist Grip and Gumming 

We tried one puree- Beets. It turned
our baby in to a zombie.
Start off with spear-shaped foods that little hands can grasp with a fist, leaving an end sticking out to gnaw on. Soft foods are preferable. You can also offer the child a loaded spoon (or loaded chip/cracker/bread) if the food is conducive to being eaten that way (like mashed potatoes or hummus on pita), but let him put the spoon to his mouth. Since your child is self-feeding, and is, let's be honest, still kind of a spazz, there will be a mess. Put the food directly on the high chair tray to avoid projectile bowls, invest in a good bib with a pocket to catch wayward morsels, lay down a tarp under the high chair (or get a dog), and stock up on washcloths. In early days, you might find that a sample of solid food simply whets your nursling's appetite for boob juice.

Stage Two: Pincer Grip


You can introduce smaller items now that they have chewing and swallowing down for the most part and can pick up little items with their fingertips. Things like blueberries, hot dogs and grapes can be introduced but should be monitored as they are choking hazards. To be safe, cut into non-windpipe sized pieces before serving. You can pre-cut bites of cooked meat or other knife-and-fork type foods for your kid


Stage Three: Utensils and Dipping

Offer your child a kiddie fork or spoon when they seem interested. At some point kids might begin to prefer to eat EVERYTHING off a fork, including whole dinner rolls, or want to dip all their food in some sort of sauce like ranch dressing or ketchup. At this point fingers may still be used too. Offer food pre-cut for little mouths. This toddler phase can include whatever you're having at mealtime.


Good First Foods for Stages One and Two


Fruits
Dried or Freeze-dried fruits (mango, pineapple, prunes, apricots, raisins, etc)
Apples (baked or sauce)
Banana
Kiwi
Oranges (Cuties or other seedless varieties)
Peaches or other stonefruit
Pears
Strawberries (and later smaller berries)

Veggies
Asparagus
Avocado (or Guacamole with chips)
Broccoli (cooked or raw)
Butternut Squash
Carrot sticks (cooked at first)
Cauliflower
Cucumber spears
Green Beans
Pepper strips (green, yellow, red - raw or cooked)
Potatoes (roasted wedges or mashed)
Sweet Potatoes (baked "fries" or mashed)
Zucchini spears

Grains, Proteins & Dairy
Cheese sticks
Egg (scrambled, hardboiled, quiche, etc.)
Hummus (on pita or pretzels)
Meats (soft meats like pulled pork or brisket, poultry in strips or chunks, ground beef etc)
Pancakes (or waffles)
Pasta (shapes like bowtie or penne are good, with any type of sauce)
Peanut Butter Toast fingers (or with jelly!)
Quesadillas
Refried Beans
Seafood
Tofu
Yogurt

Snacks
Animal Crackers
Goldfish
Lentil/Pea snap snacks
Pickles
Pirate Booty (cheaper than the Gerber puffs)
Pretzels (rods are good)
Salsa
Veggie Straws (in the chip aisle or healthfood section)

Pea snacks from TJ's
Resources

The main online resource for Baby Led Weaning is, naturally, babyledweaning.com. They have a facebook group as well. Wholesome Baby Food is another site many moms like for their healthy recipes, most of which are purees but is a good resource for baby nutrition in general and has a section on BLW. And of course, consult your pediatrician. She may think you're bonkers (mine gave me side-eye when, at his six-month appointment, I told her The KLAW had tried 40 foods already.), but can advise you on allergies and other factors particular to your baby's development.

Yum! Who doesn;t love fair corn?
Happy eating, and please feel free to contact me with any questions!


Friday, February 13, 2015

Valentine Pinwheels Recipe


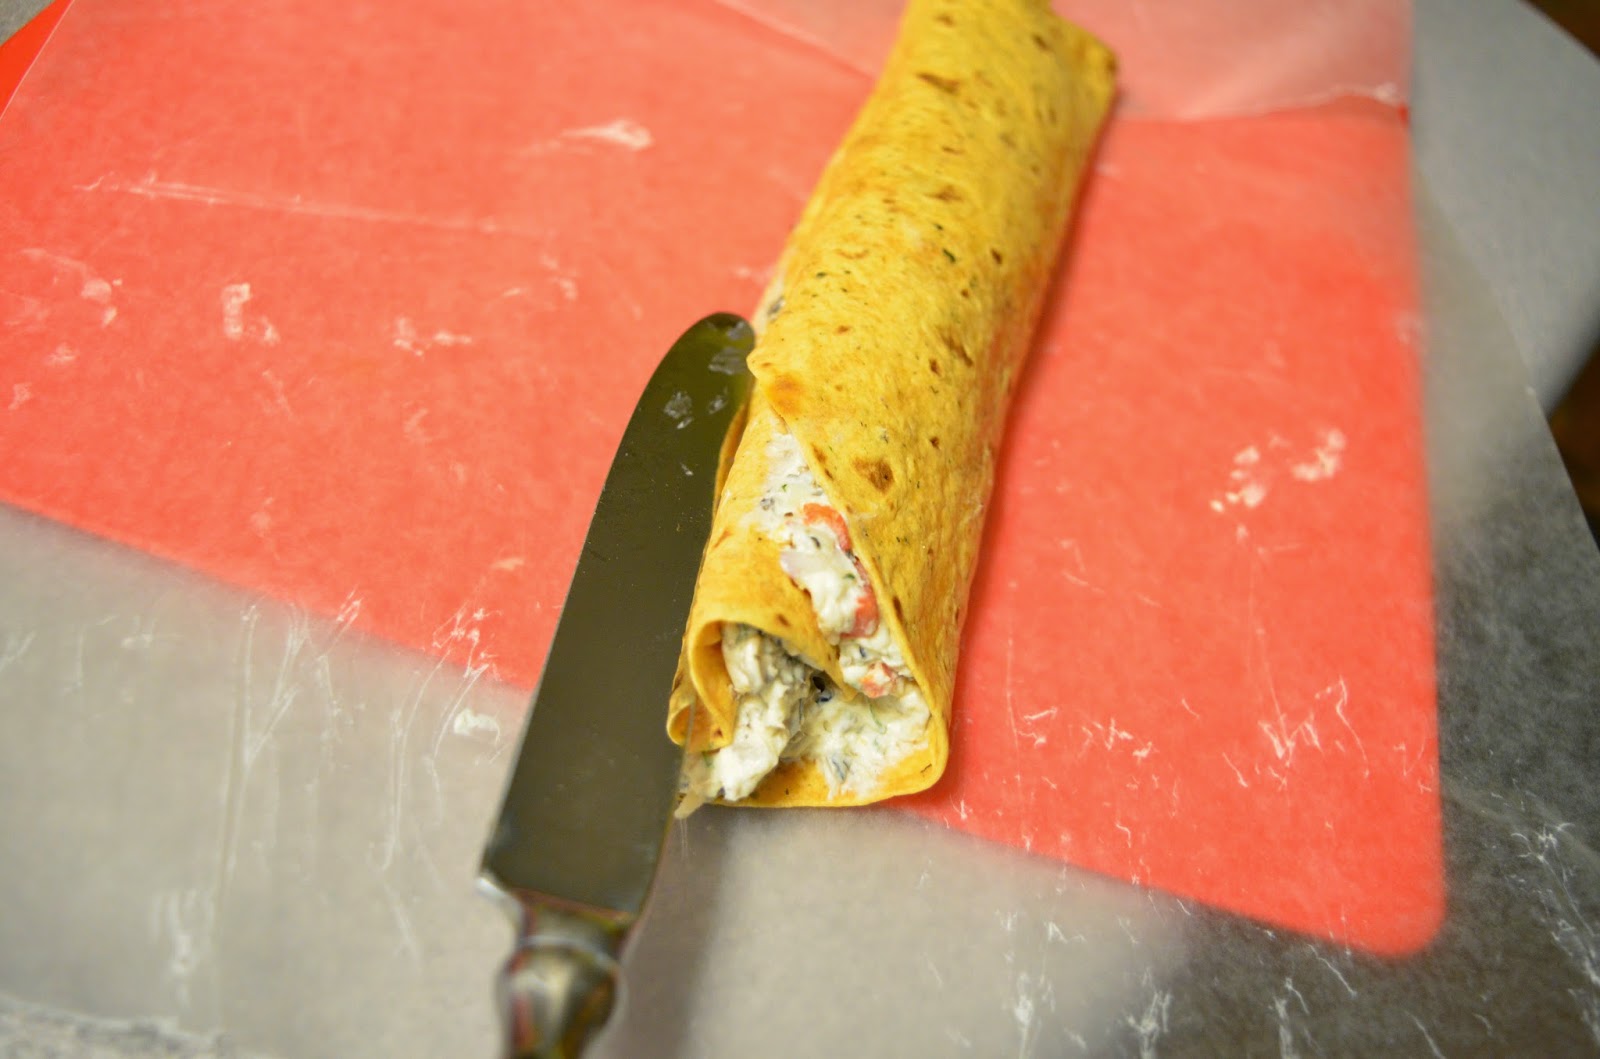
Last week I signed up to bring a treat to my toddler’s day care Valentine’s Day party. The only other thing listed on the sign-up sheet was cupcakes, so I thought I’d bring something savory. But what to bring. I was browsing pinterest and saw a cute craft where you shape a toilet paper roll into a heart and use it as a stamp. This sparked an idea. I made cream cheese pinwheels for the KLAW’s first birthday… I wondered if I could shape them in to hearts. Turns out, I could – they looked super cute and were quite tasty! I modified the original recipe to make it a little more red and valentines-ish. Here is the recipe. It wasn't a hit with all the toddlers, but you could modify the mix-ins to suit your audience’s taste. It takes less than 30 minutes to prepare the night before your event, then another 15 minutes or less to slice them up the day-of. This recipe makes 40 pinwheels.


INGREDIENTS
2 eight ounce packages of cream cheese (softened)
1 package ranch dressing mix
½ cup diced red pepper
¼ of a red onion, diced
2 ounce can of chopped olives
½ cup shredded cheese
4 large sun-dried tomato tortilla wraps

Mix the ranch dressing mix into the cream cheese, then fold in the pepper, onion, olives and cheese. 
Try not to eat the mixture
Spread the mixture on the tortillas. You can go easy on spreading the mixture on the two sides that become the open ends of the roll because you will slice them off. 

Roll the tortillas tightly.
Once they are rolled, form the hearts. Pinch one side to form a point, along the roll, to form the bottom of the heart. Opposite the point, use the dull end of a butter knife to press in a divot along the roll to form the top part of the heart. 
Wrap each tube Tootsie Roll style in waxed paper. Refrigerate overnight to allow the ranch flavors to fully come out. 
heart
tootsie roll
In the morning, using a serrated knife to gently saw the roll so as not to smoosh it, cut the ends off the rolls, and then slice each tube into approximately 10 slices (about ¾”-1" each). You can pinch the slices to make them a little more heart-shaped if they look wonky. Arrange on a plate and serve!
slice into 3/4" slices

arrange artfully

Wednesday, January 14, 2015

His and Hers Chicken Pot Pies

I am a vegetarian. My husband and son are not. I struggle to find ONE meal to satisfy us all and not have to cook everything separately (I hate dishes.). Taco night, for example, is great because I can prepare the toppings for everyone and quickly cook and season real and faux ground beef. Recently, my husband has been requesting those little banquet pot pies to have for lunch. Now that it is cold outside, I have been envious of that dish – so warm and satisfying, with the steam rising up when you break through the crust. And wholesome too – lots of good, filling veggies in there. A recipe for a vegetarian pot pie came across my inbox and so I decided it was time to make a pot pie of my own. Of course, I had to make one for my fellas, too. 

We had some leftover grilled chicken from recent restaurant meals, and it was perfect for this. I have tried every fake meat on the market and for this recipe recommend one of the following: one package of Quorn Naked Cutlets, one bag of Kroger’s Simple Truth Meatless Griller Strips (or the Morningstar Farm strips), or one package of Gardein Chicken Scallopini.


I cobbled together several recipes to get the perfect one, and I wanted to post it here so I can remember how to make it next time. Oh yes, there will be a next time. I added soy sauce and nutritional yeast to the filling to give it an extra boost of soul-warming umami. If you don’t have these on hand, no worries.

The recipe that follows is for a DOUBLE BATCH, one with real chicken and one with vegetarian chicken. You can halve the recipe if you want just one or the other, or keep it doubled but use all meat or non- meat and serve an army of carnivores or dirty hippies (though I suppose dirty hippy vegetarians wouldn't be in an army. A peaceful protest perhaps)

HIS AND HERS CHICKEN POT PIES

Ingredients:
4 large carrots, peeled and cubed
4 medium potatoes, peeled and cubed (I used red potatoes)
2 tablespoons vegetable oil
1 yellow onion, diced
16 ounces mushrooms, sliced (I used baby bellas)
¾ cup butter
¾ cup flour
1 ½ tsp sage
1 ½ tsp thyme
1 ½ tsp pepper
2 tsp salt
1 tablespoon soy sauce
1 tablespoon nutritional yeast
2 cups cooked chicken breast, cubed
AND
2 cups cooked vegetarian chick’n strips or cutlets, cubed
1 carton (32 oz.) of vegetarian chicken broth (I used the Imagine brand Vegetrian No-Chicken Broth)
1 cup frozen peas
1 Package of frozen Puff Pastry (I used Pepperidge Farm’s, it comes with 2 pieces)


Directions:
1.  Cook your chicken and chick’n. My chicken was pre-grilled and I used a large sauté pan to brown my chick’n (I used the same pan later to make the roux). Cube and set aside
2.   Boil the carrots and potatoes for about ten minutes. Drain and rinse with cool water to halt the cooking
3.   Bring your chicken broth to a boil in a large saucepan. Meanwhile, in a large stock pot, cook the onions in the vegetable oil for about three minutes. Add the mushrooms and cook until they begin to shrink. Add the sage, thyme, salt and pepper. Add in the cooked carrots and potatoes and stir to combine. Remove from heat.
4.   Divide the vegetable mixture (if you are doing a split recipe, otherwise carry on in the stock pot). Add the chicken and peas.
5.  Next up is the white sauce. Make a roux by melting the butter in a large sauté pan over medium heat. Slowly whisk in flour until the mixture bubbles and browns. Whisk the roux into the boiling chicken broth. Reduce to a simmer and whisk in the nutritional yeast and soy sauce. You should have a nice creamy sauce that is recognizably a pot pie sauce. Add this to the vegetable/chicken mixtures.
6.  Put the filling into ramekins or casserole dishes as you wish.  It is enough to fill to overflowing a 1 1 ½ qt. Corningware, so I recommend the 2 qt. sizes if you are doing two big pies.
7.  Top with the puff pastry.  I trimmed off the corners so that it was just to the edge of the dish and used the scraps to make sopapillas.
8.  Bake at 375 degrees for 30 minutes or until the pastry is golden brown and puffy.
9.  Sopapilla recipe: toss puff pastry scraps in a cinnamon sugar mixture and bake for 12 minutes at 400 degrees. Re-toss the warm pastries in the cinnamon sugar and top with a drizzle of honey.
Sopapillas