Tuesday, May 26, 2015

I Picked a Peck of Pickled... Radishes?


With my radish crop becoming ripe, I found myself with more radishes than I could possibly consume on my own. The best way I could think of to extend the life of my produce was to pickle them. Last night I did just that.


I first harvested all the radishes. There were a handful that were still too small, and may never full develop, but the yield from my twelve square feet of garden (after having already picked enough for a snack and a side dish) was well over 100 radishes. And I still have time to replant in that same square footage, if I wanted (and I probably will). Those hundred radishes resulted in 7 jars of pickles, with three of those having carrots mixed in. It would have been six 16 oz. jars of all-radish pickles.


I decided to try a couple different recipes, since I have no clue what the result would be. Naturally, I turned to pinterest and found two promising variations. One was a basic pickle, using apple cider vinegar and honey. The other was a more Asian style using rice vinegar and sugar.


I began by prepping all my radishes, removing the greens and roots. The chickens and goats seemed to enjoy those, so there is no waste! Then I sliced all the radishes to about 1/8" thickness using my mandolin, which made them nice and consistently sized, and saved me a bunch of time, I'm sure. Radishes are so small that it was a little difficult to use the hand guard thing, but I've watched enough food network to know you should never use a mandolin with your bare hands.


For the first recipe, courtesy of gardentherapy.ca, I stayed pretty true to the recipe except I used pickling salt instead of sea salt. I'm hoping the amounts required to get a good brine are pretty consistent between those two.


For the more Asian version, I modified slightly a recipe I found on the Whole Foods website to use ingredients I had on hand. Those jars contain a mixture of 2/3 radishes and 1/3 carrots. I omitted the cucumber, chilies, ginger, and onion - all of which would make them way more delicious but I didn't have the foresight to pick them up at the store. Next time! I also played with the pickling juice a bit and tested three variations:

  1. Rice vinegar and pickling salt
  2. Seasoned rice vinegar and pickling salt
  3. Seasoned rice vinegar and pink Hawaiian salt

They are in the fridge now, since both recipes are considered "quick pickles" and are not meant for long term storage. They should be ready to try by tomorrow! I'll report back with the results. fingers crossed!


Saturday, May 23, 2015

Everything's Coming up Radishes


Establishing a new farm takes a lot of patience. Waiting for the seasons to change, baby animals to grow, and gardens to start producing a bountiful harvest all require a huge investment of time and energy before there is any tangible reward. At the advice of our local Ag Extension office, I planned to get the seeds in the ground for our garden on or around April 15th. Well, mother nature had a different plan and dumped two weeks of rain on us right when I'd hoped to plant. Once the rain cleared and I was able to till the garden patch, the seeds finally went in the ground, right at the end of April. And then I waited. With no previous experience with the local soil, and never having planted a garden this big or varied, I have no idea what to expect.

Our garden has somewhere around 70 varieties of produce planted, the bulk of which are seeds from a kit we purchased a while ago that was intended as something you could keep stored in the event of societal collapse ... or if you just wanted a crap ton of seeds that were heirloom varieties. Because the kit came pre-assembled, it included many items I would have probably passed over when browsing the seed racks at the local shop, such as Swiss chard or radishes. Radishes have never held much of an appeal to me. I have never scooped a single radish on to my plate at the salad bar. I'm not sure why, perhaps just ignorance. But into the ground radish seeds went, figuring what the heck, if nothing else I'd find a radish-loving neighbor.


Lo and behold, the first green sprouts to show their leafy faces, were the radishes. They grew quickly and plentifully. I checked my notes, and realized the radish takes only 21-28 days to mature. Which means, a month into my garden I've already had my first harvest! I sampled some of the young radishes, which were so surprisingly tender and moist. I ate those sliced with some salt, and when I shared photos of my small bounty, my friends asked what recipe I would be preparing. Recipe? You mean radishes can be used for something other than salad garnish? A quick scan of pinterest revealed a slew of options for these mysterious quick-growing root vegetables.


Tonight I pulled a huge bunch of radishes fresh from the garden. Tom wanted to grill, and I didn't have time to run to the store to pick up corn or potatoes, or another staple grilling accompaniment. I know that anything you roast you can just ass easily do in a foil packet on the grill, Radishes aren't all that different from potatoes, right? 


I washed the bunch of radishes, removed the roots and greens, and quartered them. I tossed the radishes in the foil packet with a drizzle of olive oil, some salt and pepper, and a sprinkling of garlic powder for good measure. I decided to keep it simple since I had no clue what a cooked radish tasted like.  It turns out it's reminiscent of a beet crossed with a Brussels sprout. The cooking cuts the inherent spiciness of the radish but imparts a certain... earthiness? Anyhow, I recommend this recipe if you want to try a little something different. I feel a little silly writing out the actual recipe since it's so ridiculously easy, but here ya go:


Grilled Radish Packets

1 bunch radishes (about 14)
Olive oil
Salt & Pepper to taste
Garlic powder or other seasonings

Remove roots and greens from radishes and quarter. Place on a large sheet of heavy duty foil. Drizzle with olive oil and sprinkle with spices. Close foil packet up securely. Place on the upper rack of a hot grill and cook for 15-20 minutes until tender.

Enjoy!

Tuesday, May 12, 2015

Today we had a package at the post office - A Package of Bees!


Today our second colony of bees arrived! Back in February we reserved our bees from Kelley Beekeeping – with May 9th being the earliest ship data available. (We learned too late that December or January is the best time to order to secure an early spring delivery.) The bees arrive via USPS and must be picked up at the local post office. Early his morning Tom received a call that our new friends had arrived. Living in the country, our post office is not alarmed by the arrival of the small, screened wooden crate that the bees are shipped in. We went to collect our bees and brought them home to be installed straight away.
knock knock!


It was a bit of a blessing that our first hive, well established, arrived at the lazy duck ranch weeks ago. This gave Tom a chance to grow comfortable with handling the bees before having to undertake what had seemed like the daunting task of transferring bees from the shipping box to the hive.  


Tom began by “smacking the package smartly against the ground” to knock the bees to the bottom of the box (per the instructions on the youtube video he watched to refresh himself before undertaking the installation.) He then removed the cover and extracted the feeder that kept the bees nourished in transit. He located the small box that contains the queen and set it aside. The package with the bulk of the bees was upended into the hive, from which several of the honeycomb frames had been removed.

smack smartly on the ground
safety first


The small box containing the queen was next to be introduced – she was held in place with a cork and a candy plug. Her hivemates will eat away the plug until she is released from the box and into her new home. Keeping her contained in the hive is important to helping them accept their new home. The colony of bees follows its queen. Our purchased queen bee has been marked with a dot so she may be easily located when she is in the hive. After three days, Tom will reopen the hive to verify that the queen has settled in to her new home and the colony has begun producing comb in the now vacant frames.

the queen has a white dot painted on her.


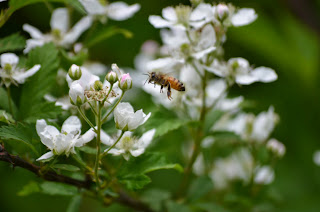
This new colony of bees has its work cut out for it to establish a store of honey to sustain them through the winter. For now, they will be supplemented with a feeder of sugar water to ensure they have are maximizing their production. Fortunately, the farm is also in full bloom with plants the bees appear to love. We've seen the bees on the blossoms on our rose, mock orange and blackberry bushes, the American holly tree, and countless other plants around the property. Their buffet also includes clover, dandelions, peonies, and soon, honeysuckle and the extensive bounty of our garden.


While our package bees are just starting out, the established colony we received has already begun to fill up the few empty honeycomb frames in the first brood box we set out. Tom added a second deep super on top of the first to allow them to expand their empire. The colony requires two deeps to last the winter, anything from additional supers on top are what we will harvest. All that jargon! Here’s a diagram to help explain.

two hives in action!